Dynamic Range Demystified: An Introduction to Dynamics and Compression

Dynamic range is one of the most important concepts in music production - and one of the least understood. In simple terms, it describes the gap between the loudest and quietest sounds in a recording. That gap is not just a technical measurement; it is what gives music its energy, its intimacy, its punch. Get it right and your tracks feel alive. Get it wrong and even a great arrangement can sound flat, fatiguing, or thin.
Compression is the principal tool for managing dynamic range, and it has shaped every recording you have ever heard - from the crack of a snare to the breathiness of a whispered vocal. Understanding it is not optional for anyone serious about their mixes.
This is Part 1 of a two-part series. Here we cover the fundamentals: what dynamic range is, how compression works, and why it became the creative cornerstone of modern music production. In Part 2 we move into practical technique - how to use compression with purpose, avoid the common pitfalls, and get feedback on your own tracks.
Not sure how your track is handling dynamics right now? Upload it to Mix Check Studio for a free analysis - no account needed.
Part one: An introduction to dynamics and compression
Sound engineers can always find something to disagree about. But ask them to organise a main event for the top heavyweights in music production and only two contenders will emerge. Expect a brutal, two-way, title match between 'dynamics' and 'tone'.
Whoever wins, tone shapes the timbre and characters while dynamics deliver body and excitement, so a solid grasp of both is fundamental. That's why our Mix Check Studio goes to great lengths to help you nail each of them. To help you understand the feedback it gives, we've created this series of articles.
Here we're looking at dynamic control. And this is a big topic, so we're splitting it across two parts. Part one looks at dynamics in general, examining the history of dynamic processors, what problems they solved, and how they've literally shaped all music since. If you're already familiar with this feel free to skip straight to part two.
Part two is more hands-on, explaining how to achieve the main functions of dynamic control, detailing modern tools and techniques, then listing practical ways to achieve exciting mixes and sidestep pitfalls.
By the end you'll have a strong conceptual understanding of dynamic control and the tools and techniques you need to achieve punchy, clear, exciting mixes that translate to any sound system.
What are 'dynamics' and why should we control them?
Dynamics is all about the gap between the loudest sound and quietest sound in any recording (or broadcast). This gap is known as the dynamic range.
The term dynamics refers to the fact that signal levels in recorded sound are constantly varying. This happens in ways that are obvious, like a song appearing to get louder when the drums kick in, to ways that are much less obvious, like the difference in level between the start of a kick drum hit and the bit that comes after.
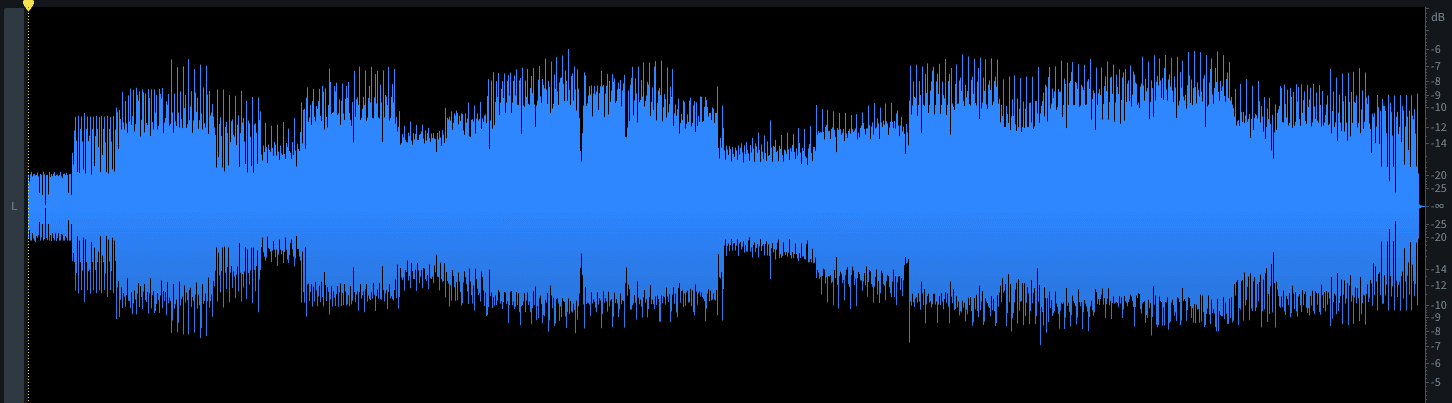
Pre-master
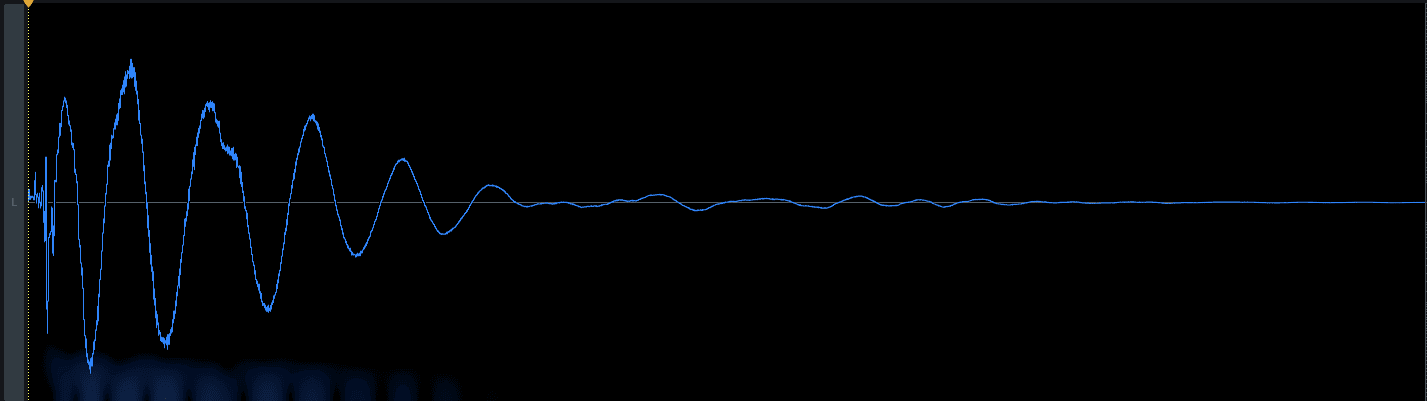
Kick
In the first, you see the level getting noticeably louder, in the second, the momentary burst of loudness - known as a 'transient' - is precisely what gives a kick its punch.
Dynamic control is essential both for making recorded music sound listenable and for making it sound exciting. And, as we'll see, compression and its powerful sibling, limiting, are the principal tools.
To properly understand dynamic processing, let's start by understanding the problem compression was designed to solve.
"Sorry, I couldn't make out what you said there..."
Dynamic control was originally introduced around the 1930s and 1940s so that people could actually hear what other people were saying on the phone or a recording. It addressed a fundamental problem we still have today.
Imagine a daytime talk show with a performative celebrity talking about their comeback. They'll whisper quietly between sobs about the depths of their fall. They'll talk earnestly about whatever saved them. They'll shout and whoop about their redemption.
Pity the poor sound engineer who has to capture this performance, as no matter how good your equipment, every recording path adds a certain amount of noise and there's a limit to the volume of things it can handle.
If we simply recorded the direct microphone feed, there's a good chance the whispers would be inaudible over the inherent hiss while the shouts would be distorted from overloading the recording medium. And anybody listening back would have to constantly jockey the volume to make it listenable.
How did compressors solve the problem?
No matter how good your system, there's a signal level below which audio gets too quiet to reproduce. And there's an upper level beyond which the signal will distort. Compression addresses this by acting like an automatic volume control.
Compressors monitor incoming audio in real time, and whenever the signal gets too loud they automatically lower the volume very quickly (response times are measured in thousandths of a second). The resulting output signal level is then raised so that the loud parts are still loud, but the quiet parts are less quiet.
The practical audible effect is both to raise the level of the quieter audio events, relative to the loudest, and to smooth over sharp loudness spikes in audio. Compression narrows the dynamic range.
By making this range narrower, the desired audio is now higher than the system noise yet free from damaging level spikes. Suddenly Britney's heartbreaking whispers on Letterman are audible and you don't need to worry that Tom Cruise will blow the woofers on your surround sound system as he leaps around Oprah's sofa.
Compression as a creative tool
What none of those early broadcast hardware designers understood at the time was that compression does far more than let you follow the trials and tribulations of your favourite stars in high fidelity.
Very quickly, audio engineers noticed how much better music sounded after it had gone through compression. The various instruments of a big band sounded more cohesive. Singers' voices sounded fuller. Everything had more body.
Listen to an example of an uncompressed loop and then the same loop compressed.
Not only that, but compressed music sounded louder. And people really liked louder.
And that was all just from using compressors as they were actually intended. But, at some point, mischievous engineers realised that compressors could do more than level out sudden spikes, they could actually be used for precisely the opposite - to make them even more prominent.
By slightly delaying the time it took for the compressor to reduce the level, you could trick it into allowing the very short spike at the start of a kick drum before pulling down the level, for example.
Listen to a before and after here.
A studio staple
By the 1950s magnetic tape had replaced direct-to-lacquer-disc recording, and engineers had started placing compressors between the microphones and the recording medium. And within an incredibly short space of time they'd discovered almost everything we use compression for today.
They used it to:
add body to individual voices or instruments
help the parts of multitrack recordings gel together
allow louder mixes to be cut to vinyl or broadcast over the radio
enhance the attack of plucked and percussive instruments
soften the attack of plucked and percussive instruments
reduce the harsh 'ess' sounds people make with their mouths when speaking or singing
automatically duck one audio signal when another plays (e.g. a radio DJ talking over music)
In fact, the more uses sound engineers discovered, the more compressors were designed accordingly. Remarkably, almost every technique we've used for the last 70 years came about in the first few years of dynamics processing.
The only two arguable exceptions came later, around the turn of the millennium:
Audible pumping of the full track (think Fred Falke's "Intro")
Noticeable pumping of an individual element (those strings on Eric Prydz' "Call On Me")
And they're basically just extreme manifestations of stuff that was known about in the 50s.
How does compression actually work?
Compressors work by monitoring the strength of an audio signal level and then using that information to control a gain-reduction section. Think of it like an automatic volume control.
The signal a compressor is analysing is usually the same as the signal it's affecting, but that's not always the case. For now though, let's keep things simple.
Ultimately, the precise action of a compressor relies on a number of settings, each with its own name.
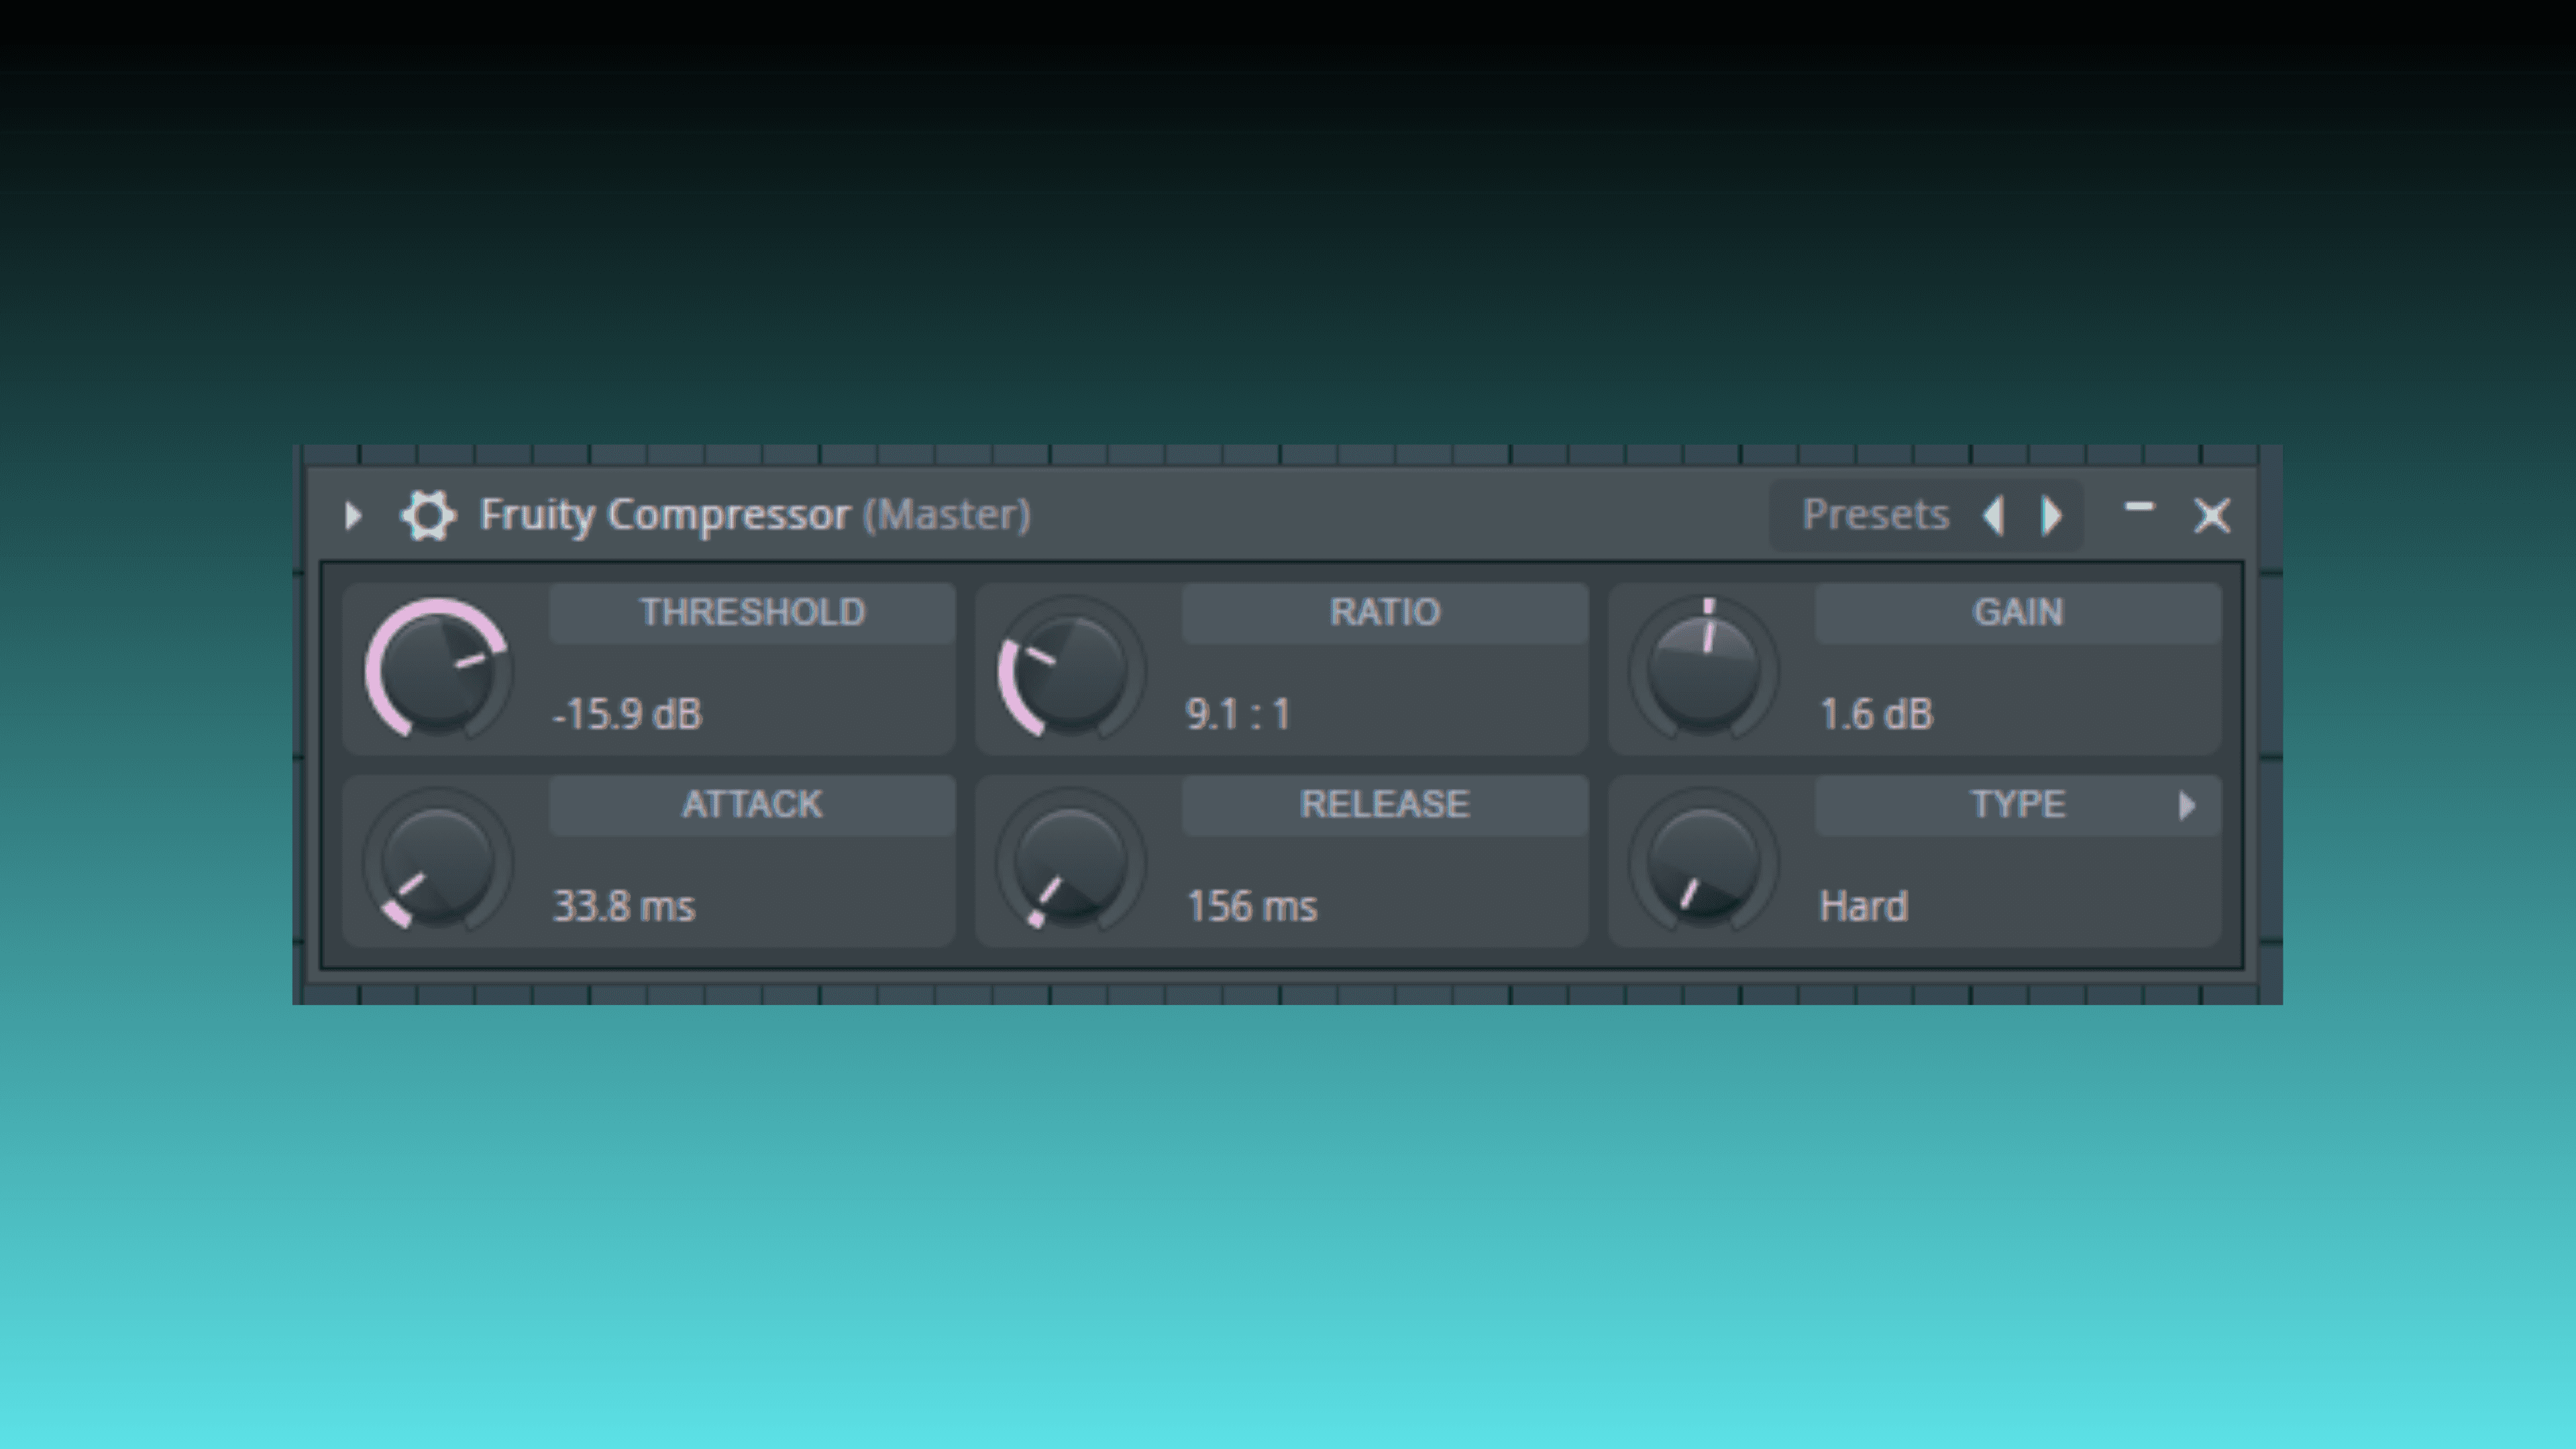
Threshold
This defines the level at which the gain reduction - also known as 'attenuation' - is triggered. The level is commonly defined in dB. For example -6dB means that compression is triggered as long as the signal level exceeds -6dB.
Ratio
This defines how much gain reduction is applied. It's called ratio as this reduction is measured as a ratio between the input signal and the output signal. So with a ratio setting of 4:1, for every 4dB of signal level above the threshold, the output signal will rise by 1dB. For example, at a ratio of 4:1, an input signal 8dB above the threshold will be output as 2dB above the threshold.
Attack
This control - set in milliseconds - determines how quickly gain reduction builds once the signal exceeds the threshold. This is important for controlling whether or not the transient attacks of sounds are smoothed or accentuated.
Release
Release sets how quickly gain reduction fades once the signal level falls. This can be critical in audio with lots of peaks. Slow settings can mean the compression amount never completely returns to zero. Fast settings can cause noticeable audio pumping.
Knee
While the attack control sets how long it takes to apply the full amount of compression, the amount of attenuation does not increase from zero to the full amount in a straight line - it's a curve. Knee controls the shape of this curve, shaping the transition from no compression to the full compression ratio, and back again. With a hard knee, the full compression ratio is applied immediately at the threshold; with a soft knee, the ratio increases progressively, producing a smoother onset and release of compression. Hard settings allow for punchy transients while soft is smoother and more transparent.
Peak / RMS
Many compressor plugins offer a choice between Peak or RMS. Don't let this intimidate you - it simply refers to a different way of detecting the peaks in your audio.
Set to peak, the detection will respond quickly to all peaks, however short - the sharp attack at the start of a snare drum strike, for example - and trigger compression accordingly.
RMS (Root Mean Squared), on the other hand, operates more like an average value. RMS detection traditionally involved using a longer detection window (often around 10-50ms) and taking an average over that period, but other methods are used to approximate this kind of response. In practice it does not respond as quickly as peak.
From a practical point of view, it's also worth noting that the Attack and Release controls can have different results on your compression when using RMS as it is intentionally less immediate.
Traditional wisdom is that RMS is favoured for things like mastering compression as it can produce smoother, more transparent results. But if Daft Punk had followed that advice in the 90s then the world of dance music might be very different today.
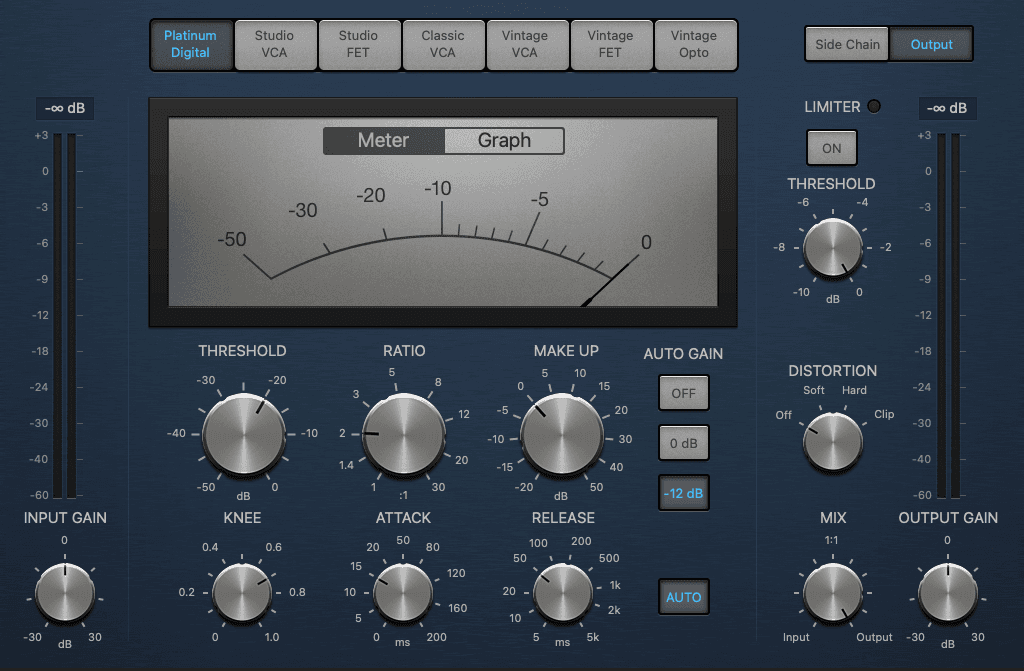
Types of compressor
There are a number of different ways hardware compressors detect signal levels, and these can have a big effect on how they respond to signal levels, transients in particular.
In optical compressors, for example, the signal level controls the brightness of an internal light source (LED, lamp, etc.), and the brightness of this is in turn detected. This method isn't incredibly responsive, but does impart a smooth, quite natural and transparent sound.
Contrast this with Voltage-Controlled Amplifier (VCA) designs, which are very fast acting, making them perfect for precise transient control.
Valve compressor designs - also known as variable mu - actually sound and behave differently the stronger the transients and signal level, with the amount of peak compression increasing in a non-linear way. They're particularly known for adding warmth and saturation to audio, and for the gelling effect they can have on full mixes, although they don't offer the punchy transients and pumping preferred for mastering many electronic genres.
And the last major hardware compressor category is FET (Field-Effect Transistor). This kind of compressor is notorious for adding punch and colour to signals, so can often be found on a drum bus.
As you can see, the design can have a powerful effect, and that's why certain compressors are particularly prized for certain tasks.
Compression plugins and digital hardware are able to mimic all of these modes of operation and dynamic characteristics - or simply offer incredibly accurate and near-instant response times. The latter is incredibly useful for peak-protection (stopping stray volume spikes damaging recordings or overloading digital-to-analogue / analogue-to-digital converters) and for powerful squashing and loudness.
Sidechain
The term sidechain confuses many people as the word is commonly used as shorthand for three different uses of a sidechain rather than the actual sidechain itself.
Technically, sidechain just refers to the signal path compressors use to detect signal level and control gain reduction.
But, in fact, every compressor kind of has a sidechain, whether it announces it or not. The incoming audio signal to a compressor is always duplicated or 'tapped' by the detection circuit, with the main audio signal continuing through the path to be compressed then sent to the outputs.
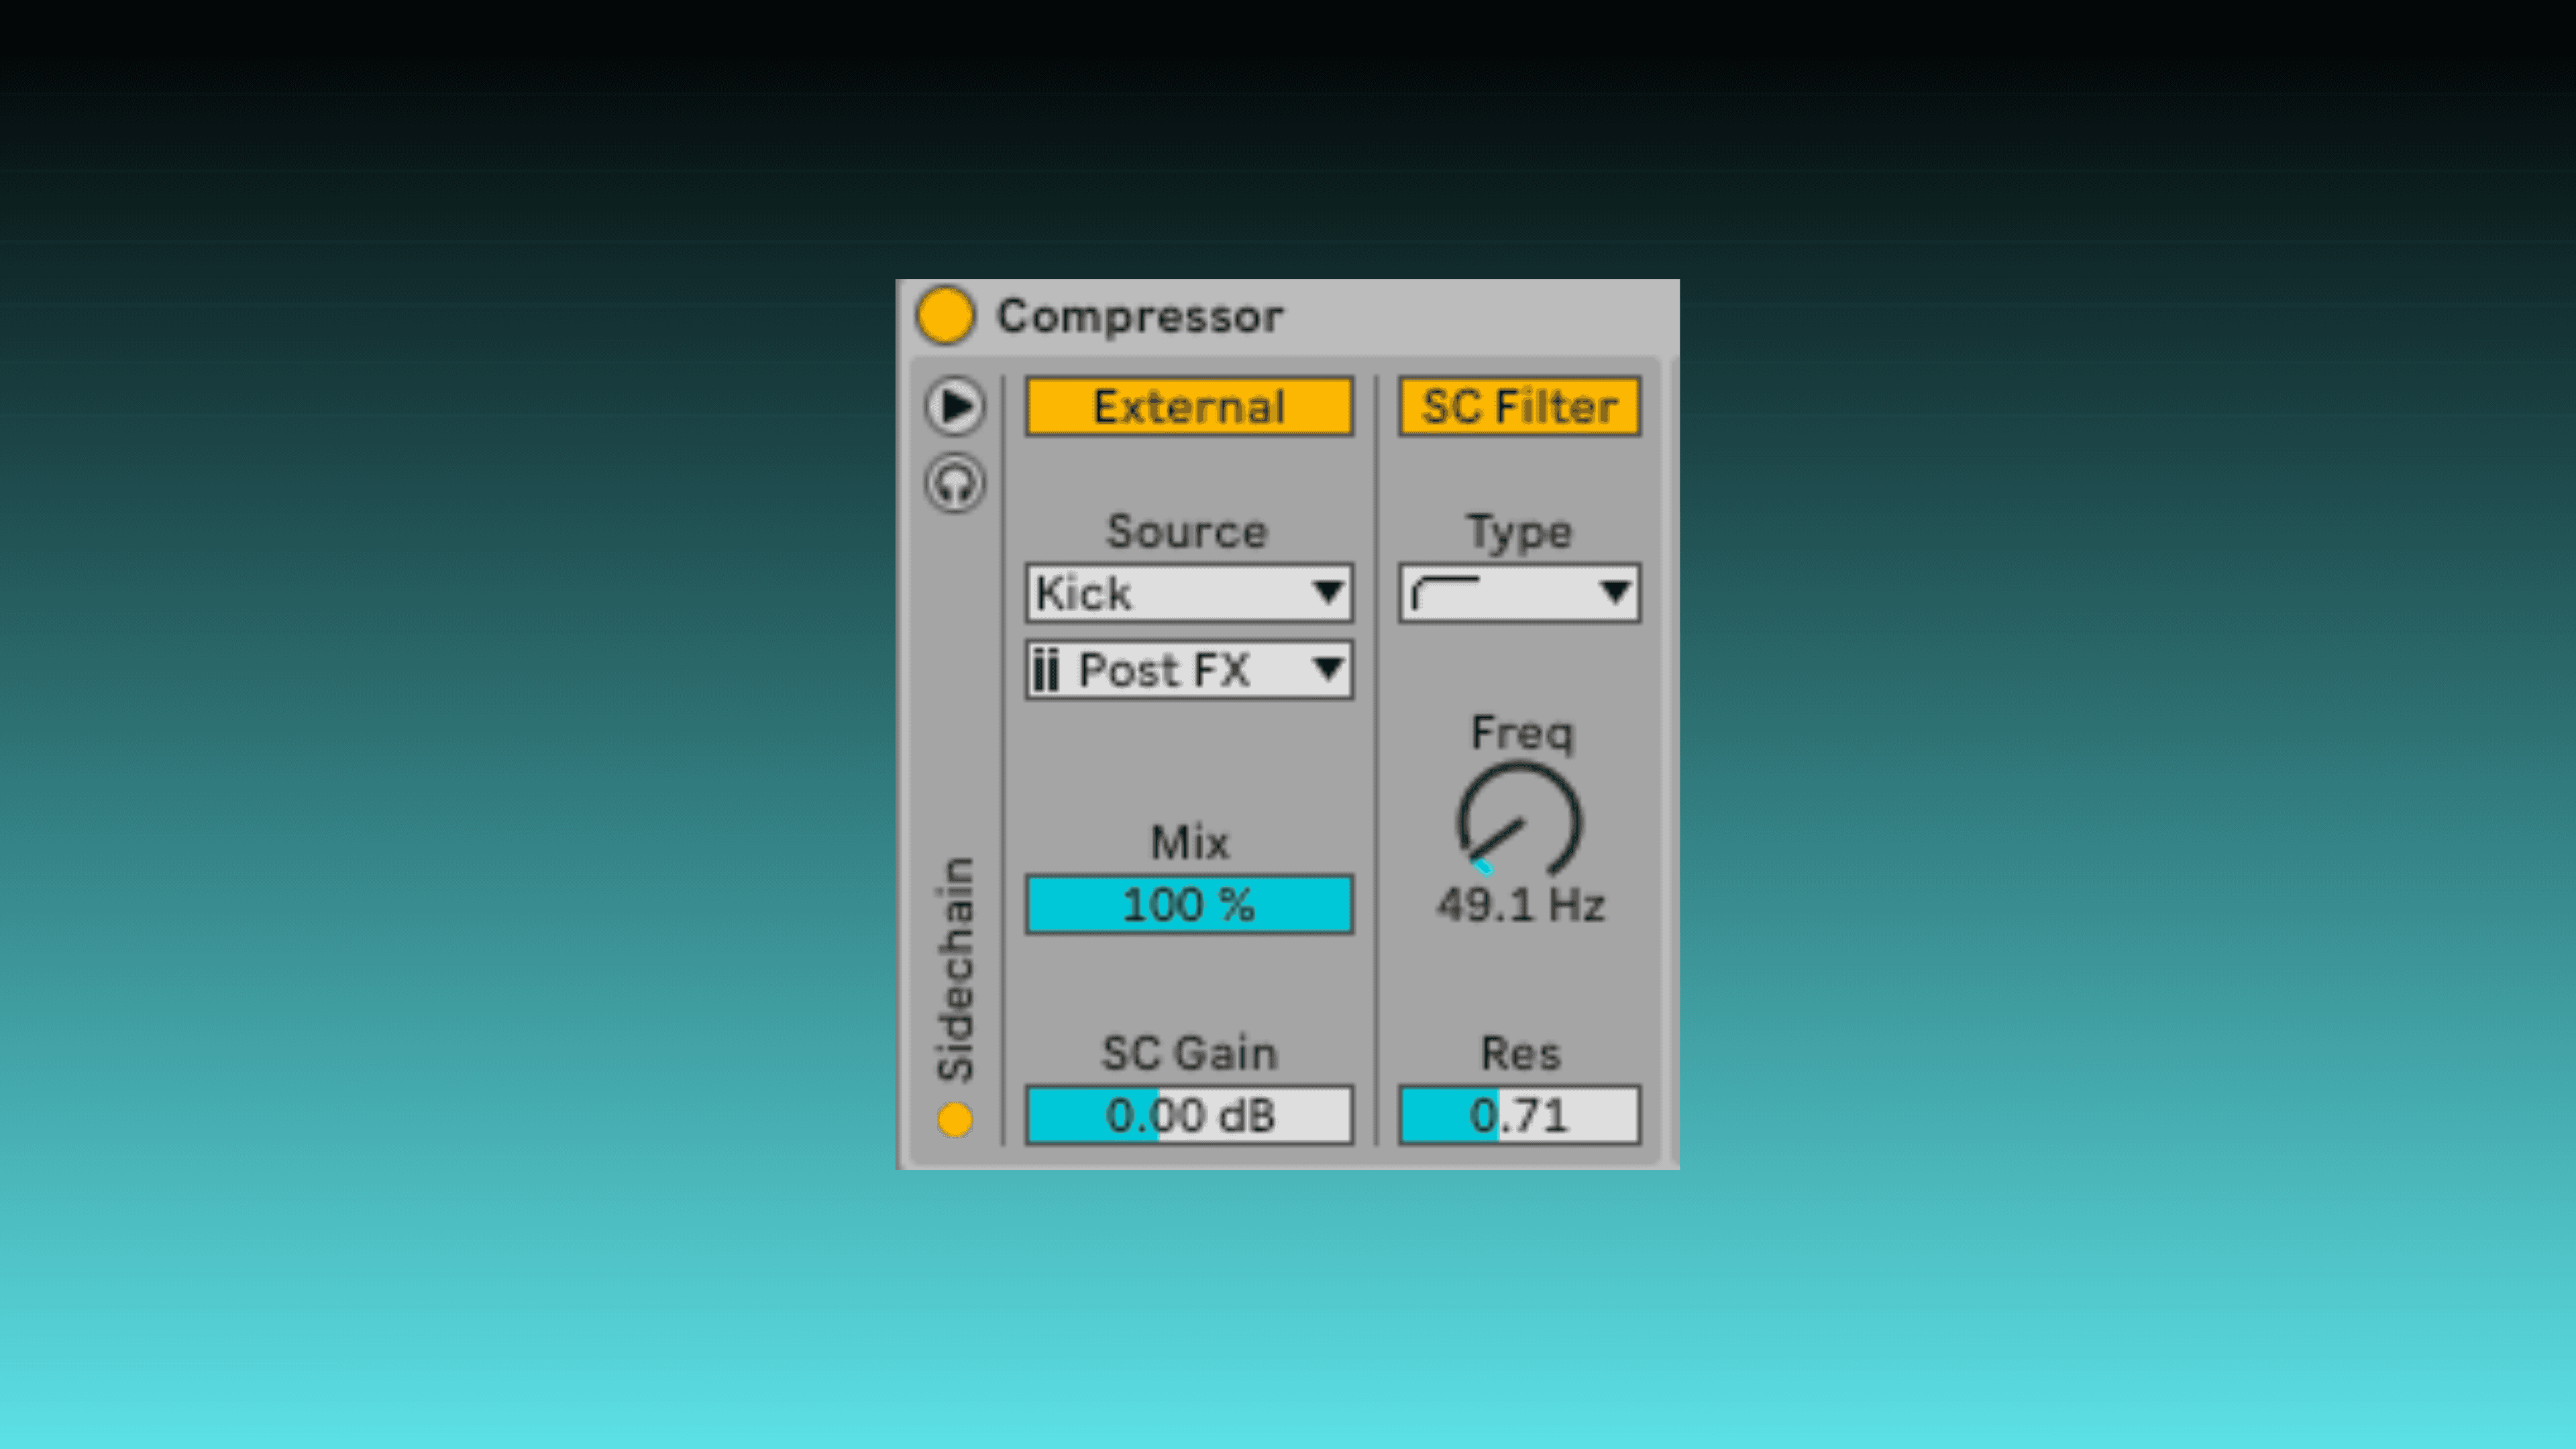
What most people mean by sidechain, though, is when the signal going to the detection circuit differs in some way from the signal being compressed. And this can mean either an EQed version of the same signal or a completely different signal from elsewhere.
Creative ducking
Let's take that pumping effect on "Call On Me". This is made by inserting a compressor into the string part while the kick drum signal is being sent to the sidechain input of the compressor. Every time there is a kick the compressor detects the loud noise and 'ducks' the volume, causing that rhythmic pumping of the strings.
Ducking as a mix tool
A less extreme version of that example can be used to help get a kick drum and bassline to play together, by ducking the bass slightly to let the attack of the kick cut through.
It can also be applied to an instrument group to duck the level using a vocal as the sidechain, making space for that vocal only when the vocal is sung.
Sidechain EQ
Sidechain EQ is when EQ is applied to a copy of the signal to be processed, which is useful in a range of contexts.
For example, when processing vocals, some mouth sounds carry a lot more bass energy (so called plosives from 'puh' and 'buh'), triggering the detection circuit, which causes noticeable level pumping. Cutting bass from the sidechain signal removes this energy and prevents pumping.
Likewise, on a drum bus, sidechain EQ can prevent the kick drum generating audible pumping.
Compression vs. limiting
We tackle limiting properly in A Simple Guide to Loudness and Metering, but it is very much a dynamic processor, so let's have a quick look here too.
Limiting can be thought of as a very extreme kind of compression - the traditional wisdom is that any compression with a ratio of 20:1 or greater is considered 'limiting'. But perhaps a more useful understanding here hinges on what limiting is used for.
Limiting is broadly used for two distinct purposes. First, to protect against extreme, damaging peaks. Second, to increase the apparent loudness of recordings and audio signals, rather than more creative transient manipulation.
What comes next
You now have a solid grounding in what dynamic range is, how compression came to define modern recording, and how the key controls actually work under the hood.
In Part 2 we get hands-on: compression for control, body, and cohesion; gain reduction targets; insert order; parallel compression; multiband; and the most common pitfalls to avoid. We also look at how Mix Check Studio reads your track's dynamics and what to do with that feedback.
If you want an objective read on how your mix is sitting right now, upload it to Mix Check Studio - it's free, takes seconds, and will tell you exactly where your dynamics stand. Or if you would rather hand the mixing off entirely, Automix handles gain staging, compression, and balance from your stems - and lets you preview the result before you pay anything.
Frequently asked questions
What is dynamic range in music?
Dynamic range is the difference between the loudest and quietest sounds in a recording. A wide dynamic range means the track moves between very quiet and very loud passages; a narrow dynamic range means the levels are more compressed and consistent. Both can be creative choices, but understanding which you have - and why - is fundamental to mixing.
What does a compressor do to audio?
A compressor automatically reduces the volume of a signal when it exceeds a set threshold. The result is a narrower dynamic range: loud peaks are pulled down and, after the output level is raised to compensate, quiet sections feel louder. This adds body, controls unwanted level spikes, and helps elements sit more consistently in a mix.
What is the difference between compression and limiting?
Compression uses moderate ratios (typically 2:1 to 10:1) to gently manage levels and shape transients. Limiting applies very high ratios (20:1 or above) to prevent a signal from exceeding a hard ceiling. Limiting is mainly used for loudness maximisation and peak protection rather than creative transient shaping. See our guide to loudness and metering for more.
What is a sidechain in compression?
A sidechain is the signal path a compressor uses to detect levels and trigger gain reduction. When people refer to "sidechaining" they usually mean routing a separate signal - such as a kick drum - to control the compression of another element, like a bassline or synth pad. This is what creates the pumping effect common in dance music.
How do I know if my mix has a dynamic range problem?
Common signs include a mix that sounds flat or lifeless, one that is too quiet relative to commercial releases, or one with harsh transients that cause distortion at higher volumes. Mix Check Studio analyses your track's dynamic range against genre references and gives you specific, actionable feedback for free.
Learn