How to Export Stems from Ableton Live and Mix with AI

Ableton Live is where most producers build their tracks. Getting those tracks from a finished session to a release-ready mix is a separate process - and it starts with exporting your stems correctly.
This guide covers everything: how to export from Ableton, what settings to use, how to get the best result from Automix, and how to bring the finished mix back into Live as a full Ableton project.
Before you export
A few things to check before you start the export:
No track should be clipping. Check levels before you export and bring down anything that is peaking too hot.
Remove corrective EQ and compression from individual tracks - Automix makes these decisions per stem. Leave any processing that is part of the sound of an instrument. A specific guitar distortion, a vocal effect you want to keep - that stays. Broad corrective work should come off.
Make sure your arrangement is finalised. Export from the Arrangement view. Anything not printed in the arrangement will not export.
Tracks need to start at the same point in the timeline - even if there is silence at the beginning of a particular track. If stems start at different positions, the timing relationships will be wrong when Automix processes them.
How to export stems from Ableton Live
Go to the Arrangement view. Select all tracks using Cmd+A on Mac or Ctrl+A on Windows.
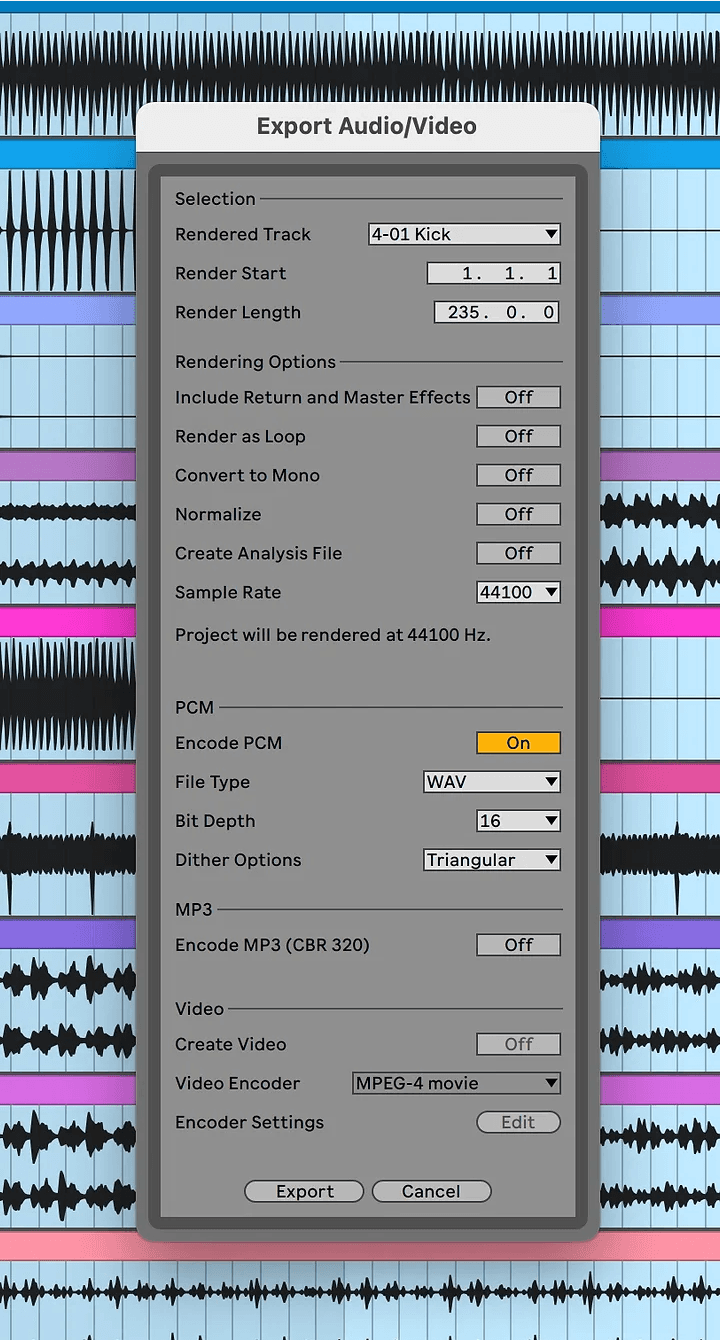
Go to File - Export Audio/Video. The keyboard shortcut is Cmd+Shift+R on Mac or Ctrl+Shift+R on Windows.
In the export settings:
Rendered Track: Selected Tracks Only
File Type: WAV
Bit Depth: 24-bit
Sample Rate: match your project - 44.1kHz or 48kHz
Render as Loop: off
Create Analysis File: off
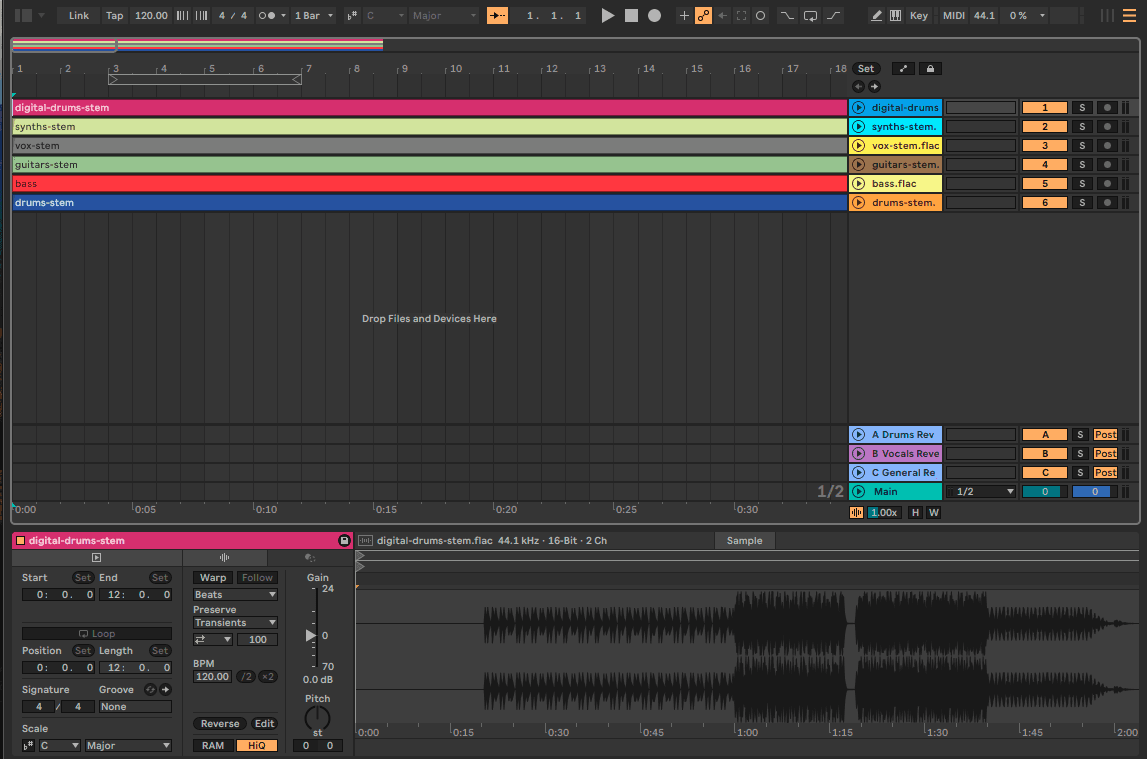
Export each track into a dedicated folder. Label files clearly - Lead Vocal, Bass, Kick, Snare, Guitars - to make categorisation in Automix faster.
Individual tracks vs stem groups
Automix handles up to 16 stems per mix on the standard plan and up to 32 stems on Automix Pro. For most sessions, exporting every significant track individually gives Automix the most to work with.
For larger sessions, group related parts before exporting. All backing vocals to one stem, all rhythm guitars to one stem, all percussion beyond kick and snare to one drums group. Keep kick, snare and bass as individual stems where possible - these are the elements Automix makes the most specific decisions about.
Uploading to Automix
Go to automix.roexaudio.com and create a new project. Drag your exported stems in or use the file browser.
Use the Detect Instruments feature to auto-categorise each stem - it reads the filename and audio content and assigns a category. Check every suggestion before generating a preview - wrong categories are the most common cause of a first result that does not sound right.
For drums specifically, Automix has five separate categories: Kick, Snare, Cymbals, Percussion and Drums. Hi-hats go into Cymbals, toms go into Percussion. Drum overheads and room mics can be grouped under the general Drums category. Exporting kick, snare, hi-hats and toms as separate stems and categorising them individually gives Automix the most control over the low end and rhythm section - which is where most of the mix work happens.
Two settings have the most impact on the result:
Genre - select the genre that best matches the track. This shapes how Automix approaches the mix - how the bass and kick sit relative to each other, how much space the vocal gets, the overall frequency balance of the master.
Importance - set the priority for each stem. Lead vocal at High, kick and bass at High, lead melodic parts at Medium to High, supporting layers at Medium or Low, FX at Low. Setting everything to High removes the hierarchy that makes a mix feel like it was made by someone who understood the track.
Generate a preview. Listen on headphones, speakers and your phone before deciding whether to download. If something is off, adjust the Importance settings and regenerate.
Getting the mix back into Ableton
Once you are happy with the preview, you can export the full session back to Ableton as a native Live Set. This requires Automix Pro.
The exported .ALS file contains every processing decision Automix made - EQ curves using Ableton's EQ Eight, compression with Ableton's Compressor and Glue Compressor, spatial treatment, panning and gain - all as editable native Ableton plugins on individual tracks.
Open it in Live and you have a professionally balanced starting point with everything visible and adjustable. Push the vocal forward, swap out a reverb, reshape the low end - the AI handles the technical groundwork and you keep full creative control.
To export: go to the download options once your preview is ready and select Ableton Live Set. For current pricing and plan details, see automix.roexaudio.com/pricing.
Automix Desktop for an offline workflow
If you prefer to keep everything local - no uploads, faster processing, audio that never leaves your machine - Automix Desktop runs the same AI engine directly on your Mac or Windows computer. The stem export process from Ableton is identical. The .ALS export back to Live works the same way. Automix Desktop is included with Automix Pro.
For a full walkthrough of the Desktop workflow, How to Use Automix Desktop: A Complete Guide covers every step.
Automix for Ableton Live extension
An Ableton Live extension is in development that will integrate Automix directly into the Ableton environment - removing the export and upload step entirely and running the mix from inside your Live session. Details will be published when the extension launches.
Video walkthrough
For a full video walkthrough of stem preparation and the Automix workflow in Ableton, watch this:
Frequently asked questions
Should I flatten or freeze tracks before exporting?
Freeze CPU-intensive tracks to ensure they export cleanly. Flattening is not required - Ableton handles the audio render during export regardless. Make sure any frozen tracks are rendered with effects printed.
Can I export from the Session view?
The Arrangement view is the reliable option. All stems need to start at the same point in the timeline - the Arrangement view makes this straightforward to control. Session view clips can be exported but it is easier to get the alignment wrong.
How many stems can I upload?
Up to 16 stems on the standard plan, up to 32 stems on Automix Pro. For sessions larger than this, group related parts before exporting and keep kick, snare and bass as individual stems where possible.
Do I need to remove reverb and delay before exporting?
Only if you want Automix to handle the spatial treatment from scratch. If a reverb is part of the character of an instrument, leave it. Set the reverb option in Automix to None for that stem to avoid applying reverb twice.
What format does the Ableton Live Set export come in?
An .ALS file that opens in Ableton Live. The session includes your original stems as audio clips with Automix's processing applied using Live's native stock plugins on each track - EQ Eight, Compressor, Glue Compressor, Reverb.
What export format does Automix use for downloads?
All Automix exports are rendered at 44.1kHz / 16-bit WAV, MP3 or FLAC. For the highest quality source material going into Automix, export your Ableton stems as 24-bit WAV at your session's native sample rate.
Learn